

A safe recovery routine helps your body heal while reducing the risk of setbacks and re-injury. By progressing gradually and following the right plan, you can rebuild strength, restore movement, and return to your daily activities with greater confidence.
An injury changes everything in a moment. One minute you’re training, working, or enjoying your favorite activity. Next, you’re wondering how long recovery will take and whether you’ll get back to the way you were before.
Those concerns are completely normal.
The biggest challenge isn’t just healing the injury, it’s knowing what to do next. Move too soon and you risk another setback. Wait too long and stiffness, weakness and loss of confidence can slow your progress.
Research suggests that up to 40% of athletes experience another injury within a year of returning to sport, often because they rushed the process or followed an unstructured rehabilitation plan. Recovery isn’t about getting back as quickly as possible, it’s about getting back safely.
Throughout my career, I’ve learned that the people who recover best aren’t always those who heal the fastest. They’re the ones who stay consistent, respect each stage of recovery, and make steady progress over time.
At FeelGoodEase, we believe successful rehabilitation combines evidence-based recovery strategies with practical habits that people can follow every day.
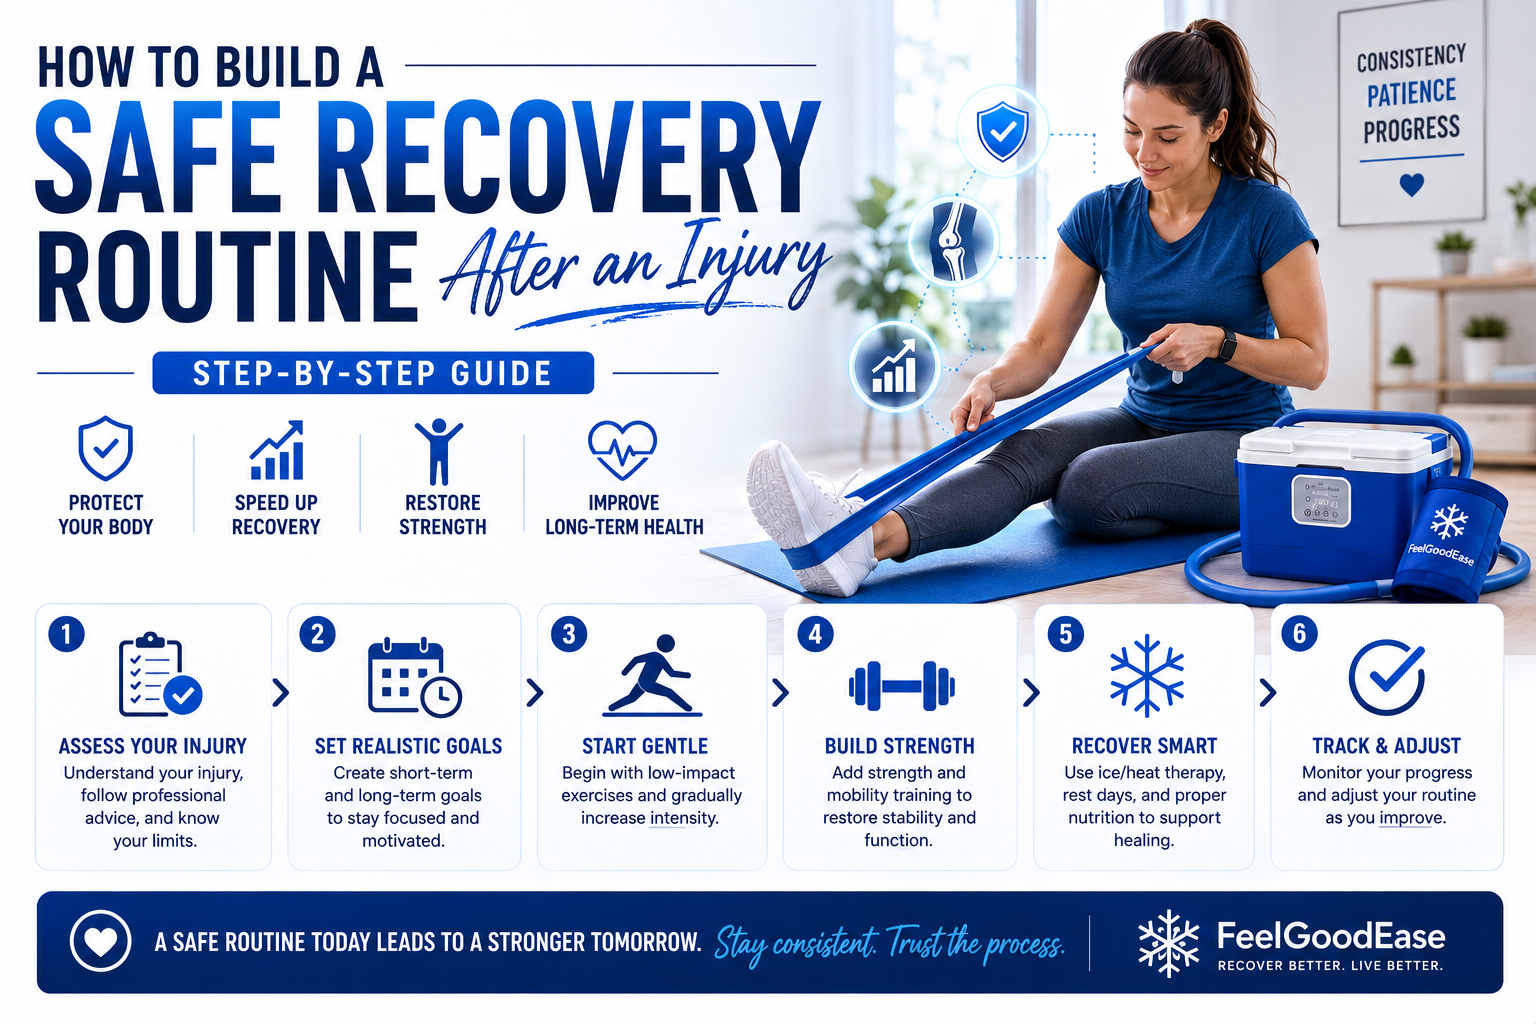
In this guide, I’ll show you how to build a safe recovery routine from managing the first 72 hours after an injury to rebuilding movement, restoring strength and returning to activity with confidence.
Let’s begin by understanding what happens inside your body immediately after an injury.
Understanding Your Injury: Types, Grades and Healing Timelines
Understanding your injury is the first step toward a safe recovery. Different tissues heal at different rates, so knowing the type and severity of your injury helps you set realistic expectations and avoid returning to activity too soon.
Before starting rehabilitation, it’s important to understand what you’re recovering from. Muscles, ligaments, tendons and bones all heal differently because of their structure and blood supply. That’s why your recovery plan should be based on your injury, not someone else’s experience.
Common Types of Injuries
Most rehabilitation programs involve one of these injuries:
- Muscle strains: Tears in muscle fibers caused by overstretching or sudden force.
- Ligament sprains: Injuries to the tissues that stabilize joints, commonly affecting the ankle, knee, or wrist.
- Tendinopathy: Tendon irritation or degeneration caused by repeated overload.
- Stress fractures: Small cracks in a bone caused by repetitive impact.
- Joint dislocations or subluxations: Partial or complete displacement of a joint.
Clinical Tip: Muscle strains usually heal faster than ligament sprains because muscles receive a better blood supply. Understanding this difference can help you set more realistic recovery goals.
Understanding Injury Grades
The severity of an injury often determines how long recovery will take.
- Grade 1: Mild damage with minimal swelling and little loss of function.
- Grade 2: Partial tearing with noticeable swelling and reduced movement.
- Grade 3: Complete rupture or severe instability that often requires specialist treatment and in some cases, surgery.
Typical Healing Timelines
While every recovery is different, these general timelines provide a useful starting point.
| Injury | Typical Recovery Time |
| Grade 1 muscle strain | 2-4 weeks |
| Grade 2 muscle strain | 4-8 weeks |
| Grade 3 muscle strain | 3-6 months |
| Grade 1 ligament sprain | 2-6 weeks |
| Grade 2 ligament sprain | 6-12 weeks |
| Grade 3 ligament sprain | 3-12 months |
| Early-stage tendinopathy | 6-12 weeks |
| Chronic tendinopathy | 3-6 months |
| Stress fracture | 4-8 weeks (depending on location) |
These timelines are guidelines, not guarantees. Your age, overall health, sleep, nutrition and commitment to rehabilitation all influence how quickly you recover.
Rather than focusing only on the calendar, follow a phase-based recovery plan. Progress to the next stage based on your movement, strength and symptoms not simply because another week has passed.
Set Realistic Expectations
Recovery is rarely a straight line. Some days you’ll feel stronger, while others may feel slower. Temporary stiffness or mild discomfort doesn’t always mean you’ve gone backwards.
Focus on consistent progress instead of daily perfection.
Recovery Insight: Once you’ve entered the rebuilding phase, increase your training load by no more than 10% per week. Gradual progression gives healing tissues time to adapt and helps reduce the risk of re-injury.
The POLICE Protocol: What to Do During the First 72 Hours
The POLICE protocol Protection, Optimal Loading, Ice, Compression and Elevation is the modern approach to early injury management. Instead of prolonged rest, it promotes controlled movement while protecting healing tissues, reducing stiffness and supporting a safer recovery.
The first 72 hours can shape the rest of your recovery. The goal isn’t to push through discomfort or avoid movement altogether, it’s to protect the injured area while introducing gentle, pain-free movement at the right time.
Protection
Avoid movements that cause sharp discomfort, especially during the first 24 to 72 hours. If walking or using the injured limb changes your movement pattern, temporary support such as a brace, sling or crutches may help.
Protection doesn’t mean complete immobilization. Keeping a joint still for too long can increase stiffness and slow recovery.
Optimal Loading
One of the biggest differences between POLICE and the older RICE approach is optimal loading.
As symptoms begin to settle, introduce gentle, pain-free movement within the limits recommended by your healthcare provider. Simple range-of-motion exercises and isometric contractions help maintain muscle activation without placing unnecessary stress on healing tissue.
Clinical Tip: Recovery improves when you find the balance between rest and movement. Too much rest can lead to stiffness and muscle loss, while too much activity may delay healing.
Ice
Cold therapy can help reduce discomfort and manage swelling during the first 48 hours after many acute injuries. Apply cold for 15 to 20 minutes every two to three hours using a towel or protective layer between the cooling source and your skin.
For more consistent and targeted treatment, many people choose a Cold Therapy Machine or a reusable cold therapy wrap instead of traditional ice packs, particularly after joint injuries or surgery.
Compression
Compression helps limit swelling and provides gentle support during the early stages of recovery.
Elastic bandages and compression sleeves are both effective. The wrap should feel snug without causing numbness, tingling, or changes in skin colour.
Elevation
Whenever possible, keep the injured area above the level of your heart during the first 48 hours. Elevation works best when combined with cold therapy and compression.
When to Seek Immediate Medical Care
Seek prompt medical attention if you:
- Cannot bear weight or use the injured limb.
- Notice a visible deformity or exposed bone.
- Experience numbness, tingling, or loss of sensation.
- Have severe discomfort that doesn’t improve with protection and cold therapy.
- Develop increasing redness, warmth, swelling, or fever after an open injury.
Recognising these warning signs early can help prevent complications and ensure you receive the appropriate treatment.
From Couch to Comeback: A 4-Phase Recovery Blueprint
Recovery isn’t just about time, it’s about progressing through the right stages. This four-phase framework helps you protect the injury, restore movement, rebuild strength and return to activity safely.
Every recovery is different. Your progress depends on the type of injury, its severity, and how consistently you follow your rehabilitation plan. Use these timelines as a guide, not a deadline.
Recovery at a Glance
| Phase | Typical Timeline | Primary Goal | Ready to Progress When… |
| Acute | 0-72 hours | Protect the injury and reduce swelling | Basic movement no longer causes sharp discomfort. |
| Repair | 3 days-6 weeks | Restore mobility and begin light strengthening | Movement is nearly pain-free with minimal swelling. |
| Strengthening | 6 weeks-3 months | Rebuild strength, balance and control | Strength reaches about 80-90% of the uninjured side. |
| Return to Activity | 3-6+ months | Return safely to work, exercise or sport | Sport- or activity-specific movements feel comfortable and controlled. |
Note: Recovery timelines vary based on your injury, overall health and your healthcare provider’s recommendations.
Phase 1: Acute (0-72 Hours)
Focus on protecting the injury while introducing gentle, pain-free movement.
Follow the POLICE protocol, perform gentle range-of-motion exercises and avoid keeping nearby joints completely still. Light isometric contractions can help maintain muscle activation if they’re comfortable.
Clinical Tip: Mild discomfort is acceptable. Sharp or increasing pain means it’s time to stop.
Move on when: Swelling begins to settle and basic movements feel comfortable.
Phase 2: Repair (3 Days-6 Weeks)
Restore normal movement and gradually reload the injured tissue.
Increase your range of motion, introduce light resistance bands and include low-impact activities such as walking, cycling, or swimming if recommended. Balance exercises also help rebuild joint stability.
Move on when: You have near full pain-free movement, minimal swelling and everyday activities feel comfortable.
Phase 3: Strengthening (6 Weeks-3 Months)
Rebuild strength, endurance and confidence before returning to higher-level activity.
Progress resistance training gradually using body weight, bands or weights while adding movements that match your daily activities or sport.
Clinical Tip: Follow the 10% rule by increasing weight, distance or training volume by no more than about 10% each week.
Move on when: The injured side performs at least 80-90% as well as the uninjured side.
Phase 4: Return to Activity (3-6+ Months)
Return gradually instead of jumping back into your previous routine.
Increase training volume step by step, continue mobility and strength work and monitor how your body responds over the next 24 hours. Functional tests performed by a physical therapist or coach can help confirm you’re ready.
Practical Takeaway: Returning because you feel better isn’t enough. Return because your body has demonstrated it’s ready.
Pain Management and Monitoring: Understanding Helpful vs. Harmful Pain
Not every ache means something is wrong. Knowing the difference between normal recovery discomfort and warning signs helps you progress safely without delaying healing or increasing the risk of re-injury.
One of the most common questions after an injury is, “Should this hurt?” The answer depends on the type of pain you’re feeling.
Mild discomfort is often a normal part of rehabilitation as healing tissues adapt to movement. Sharp, worsening or persistent pain is a sign to slow down and reassess.
A Simple Pain Scale
Use this guide to decide whether to continue or modify your activity.
| Pain Level | What It Means | What to Do |
| 0-3 | Mild discomfort with little or no limitation. | Continue and monitor your symptoms. |
| 4-6 | Moderate discomfort affecting movement. | Reduce intensity or modify the activity. |
| 7-10 | Severe pain or significant movement limitation. | Stop and seek medical advice if symptoms persist. |
Helpful Pain vs. Harmful Pain
Normal recovery discomfort:
- Dull aching or gentle stretching during movement.
- Mild soreness that settles within 24 hours.
- No increase in swelling or joint instability.
Warning signs:
- Sharp, stabbing, or burning pain.
- Symptoms that worsen during activity.
- Increasing swelling, instability, or pain that disrupts sleep.
Clinical Tip: The following day tells you more than the workout itself. If pain or swelling is noticeably worse after 24 hours, reduce the intensity of your next rehabilitation session.
When to Seek Professional Advice
Arrange a medical assessment if you experience:
- Pain that doesn’t improve after a few days of appropriate self-management.
- Difficulty bearing weight or using the injured limb.
- Numbness, tingling or increasing weakness.
- Repeated joint instability.
- Night pain that regularly interrupts your sleep.
Track Your Recovery
Don’t just monitor pain and track your progress.
Record your pain level, rehabilitation sessions, sleep, swelling and daily activity in a notebook or recovery app. Looking back over several weeks often reveals steady improvement that’s easy to miss from day to day.
Practical Takeaway: Use a simple Pain and Activity Log to monitor your recovery and share your progress with your physical therapist or healthcare provider.
Nutrition and Hydration: Fueling Recovery From the Inside Out
Your rehabilitation plan is only part of the recovery process. The nutrients and fluids you consume provide the building blocks your body needs to repair tissue, rebuild muscle and support healing.
Even the best rehabilitation program can’t compensate for poor nutrition. Giving your body the right fuel helps support tissue repair, maintain energy and rebuild strength throughout recovery.
Key Nutrients for Recovery
Focus on a balanced diet that includes these essential nutrients:
| Nutrient | Why It Matters | Good Food Sources |
| Protein | Repairs muscle and supports tissue rebuilding. | Lean meat, eggs, Greek yogurt, legumes, tofu, protein powder. |
| Vitamin C | Supports collagen production. | Citrus fruits, strawberries, kiwi, bell peppers. |
| Zinc | Helps tissue repair and immune function. | Beef, pumpkin seeds, oysters, beans. |
| Omega-3 Fatty Acids | Help regulate inflammation during recovery. | Salmon, mackerel, walnuts, flaxseeds. |
| Calcium & Vitamin D | Support bone healing and musculoskeletal health. | Dairy products, fortified plant milks, leafy greens, sensible sunlight exposure. |
Clinical Tip: Aim for 1.6-2.2 grams of protein per kilogram of body weight each day and spread your intake across three or four meals. Consuming 25-40 grams of protein per meal supports muscle repair more effectively than eating most of your protein in one sitting.
Stay Hydrated
Hydration supports circulation, nutrient delivery and the removal of waste products from healing tissues.
A simple guideline is to drink about half your body weight (in pounds) as ounces of water each day. For example, someone weighing 160 pounds should aim for around 80 ounces daily. Increase your intake if you’re exercising or recovering in a hot environment.
Choose Foods That Support Healing
Include foods such as berries, leafy greens, salmon, walnuts, ginger, turmeric (with black pepper), and green tea as part of a balanced diet. These foods help support your body’s natural recovery process without replacing the fundamentals of good nutrition.
Recovery isn’t built on one healthy meal, it’s built on consistent habits that support healing every day.
Sleep and Stress Management: Essential for Recovery
Sleep and stress management play a vital role in healing. Without enough rest, your body repairs tissue more slowly, and ongoing stress can make recovery more challenging.
Recovery doesn’t stop when your rehabilitation session ends. Much of the repair happens while you sleep.
During deep sleep, your body releases growth hormone, which supports tissue repair and muscle recovery. Poor sleep also raises cortisol, the body’s main stress hormone, slowing healing and making discomfort feel more intense.
Prioritize Quality Sleep
Aim for 7-9 hours of sleep each night and keep a consistent bedtime and wake-up schedule, even on weekends.
Simple habits can improve sleep quality:
- Keep your bedroom cool, dark and quiet.
- Avoid screens for at least 60 minutes before bed.
- Limit caffeine after 2 PM if it affects your sleep.
Clinical Tip: If discomfort is keeping you awake, speak with your healthcare provider or physical therapist. Small adjustments to your sleeping position or rehabilitation schedule may improve your comfort.
Manage Stress During Recovery
Recovery isn’t only physical. Injuries can interrupt your routine, reduce your independence and create anxiety about returning to normal activities.
Long-term stress keeps cortisol levels elevated, which can slow healing and increase pain sensitivity. Taking a few minutes each day for deep breathing, mindfulness, journaling, or gentle yoga can help reduce stress and improve your focus during rehabilitation.
Recovery isn’t about pushing harder every day. It’s about giving your body and mind the time they need to heal.
Mental and Emotional Recovery: Rebuilding Confidence After an Injury
Recovery isn’t only physical. Rebuilding confidence, managing frustration, and overcoming the fear of movement are essential parts of returning to daily activities or sport safely.
One of the biggest obstacles after an injury isn’t always pain, it’s the fear of getting injured again. I’ve worked with many people who were physically ready to return but still hesitated because they no longer trusted the injured area.
Common Emotional Challenges
It’s normal to experience setbacks such as:
- Fear of re-injury.
- Frustration with slow progress.
- Loss of confidence.
- Reduced motivation during rehabilitation.
- Feeling disconnected from your usual activities or training.
Recognising these challenges is the first step towards overcoming them.
Rebuild Confidence Gradually
Confidence grows through consistent progress, not dramatic breakthroughs.
Set small weekly goals, such as walking without a limp, completing every rehabilitation session, or improving your range of motion. Each milestone reinforces that you’re moving in the right direction.
Mental rehearsal can also help. Visualising smooth, pain-free movement may improve confidence when combined with your rehabilitation program.
Just as importantly, pay attention to your self-talk. Replace thoughts like “I’ll never get back to normal” with “I’m making steady progress.”
Clinical Tip: If fear of movement is stopping your progress, ask your physical therapist about graded exposure. This technique gradually reintroduces challenging movements, helping rebuild confidence safely.
Recovery in Practice
A runner recovering from a Grade 2 hamstring strain returned to running after following a structured rehabilitation plan and progressing through each recovery phase without rushing the process.
Another patient recovering from an ankle sprain rebuilt confidence through balance training, gradual return-to-play drills and regular progress tracking instead of returning to sport too early.
Recovery isn’t about eliminating fear. It’s about building enough confidence to move forward safely, one step at a time.
Common Recovery Mistakes That Can Slow Your Progress
Most recovery setbacks happen because people rush the process, skip rehabilitation, or ignore the habits that support healing. Avoiding these mistakes can help you recover more safely and reduce the risk of re-injury.
Successful recovery isn’t about doing more, it’s about doing the right things consistently.
Mistakes to Avoid
- Pushing through sharp pain. Mild discomfort can be normal, but sharp or worsening pain is a signal to stop.
- Skipping rehabilitation sessions. Consistency is more important than occasional hard work.
- Relying too much on pain medication. Medication may relieve symptoms but shouldn’t replace rehabilitation or professional advice.
- Resting for too long. Prolonged inactivity can lead to stiffness, muscle loss, and slower recovery.
- Ignoring nutrition and sleep. Your body needs adequate fuel and rest to repair damaged tissue.
- Returning too soon. Feeling better doesn’t always mean you’re ready for full activity.
- Comparing your recovery to someone else’s. Every injury heals at its own pace.
Clinical Tip: If your progress stalls despite following your rehabilitation plan, schedule a review with your physical therapist. Small adjustments can often get your recovery back on track.
Sample Weekly Recovery Schedule
A simple routine makes it easier to stay consistent. This example is designed for the repair phase of a lower-body injury but can be adapted to other conditions.
| Day | Morning | Afternoon / Evening | Focus |
| Monday | Rehabilitation exercises | Stationary bike | Cold therapy if needed |
| Tuesday | Gentle mobility | Upper-body training (if approved) | Prioritise sleep |
| Wednesday | Rehabilitation and balance exercises | Pain-free walk | Track progress |
| Thursday | Rehabilitation exercises | Low-impact cross-training | Stay hydrated |
| Friday | Recovery day | Gentle stretching | Improve mobility |
| Saturday | Rehabilitation and longer walk | Leisure activity | Support mental recovery |
| Sunday | Rest or light mobility | Meal preparation | Review weekly progress |
Avoid foam rolling directly over an acute injury unless advised by your healthcare provider.
When to Consult a Healthcare Professional
Many injuries recover well with a structured rehabilitation plan, but persistent or worsening symptoms should always be assessed by a qualified healthcare professional. Early treatment can prevent complications and support a safer recovery.
If your recovery isn’t progressing as expected, don’t rely on guesswork. A professional assessment can identify problems early and help you avoid unnecessary setbacks.
When to Seek Medical Advice
Arrange a medical assessment if you experience:
- Pain that doesn’t improve after one to two weeks of appropriate self-management.
- Difficulty progressing despite following your rehabilitation plan.
- Recurring swelling, joint instability, or repeated episodes of the injury giving way.
- A suspected fracture, complete muscle or ligament tear or serious joint injury.
- Numbness, increasing weakness, loss of sensation or changes in bowel or bladder control.
The Value of Physical Therapy
A physical therapist can assess your movement, identify compensations, and create a rehabilitation plan tailored to your injury and goals. They also use objective testing to determine when it’s safe to return to work, exercise or sport.
Clinical Tip: Even one or two sessions with a physical therapist can provide a personalised home program, clear progression milestones and the confidence to continue your recovery safely.
Medical Disclaimer
The information in this article is for educational purposes only and is not a substitute for professional medical advice, diagnosis, or treatment. Always consult your physician, physical therapist, or another qualified healthcare professional regarding any injury or medical condition. Never delay seeking professional medical advice because of information you have read in this guide.